To follow on from the last blog post, I made a google code page for the server assist overlays. This is a demonstration of how to use GDAL to build geo-referenced images and pixel maps for user interaction on the fly.
This allows for lots and lots of polygons/lines/points to be drawn and still allows the user to interact. This is useful for when your data is too large for the javascript overlays of google maps to handle.
Take a look:
http://code.google.com/p/server-assist-overlays/
Monday, April 11, 2011
Saturday, May 1, 2010
Making Geo-Referenced Images in Python with GDAL
Often it might be desirable to make an image to overlay on Google Maps instead of creating tiles or using markers or polygon/polyline overlays. The Geospatial Data Abstraction Library (GDAL) provides python bindings that can be used to reference points between geospace, at different projections, and pixel space.
First you will need to know the bounds of t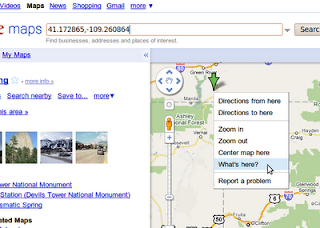 he area you are targeting. For this example we will use temperature data from RWIS roadside sensors but we are only interested in Colorado. At the time of this writing you can right click on Google Maps and click "What's here?" and it will display the latitude and longitude in the search box.
We will need to setup the projections, this EPSG (900913, google) is known to work with Google Maps (and others):
We will also need a projection for our input decimal latitude longitude values:
We will also need a geotransform array that defines the origin and pixel size of the projection we want to use. This can be created with the boundaries we chose above and the width and height of the image we want to create, there should be a relationship between negative pixel sizes and the hemisphere you are mapping because the mercator origin is not at the top left of the earth, this code attempts to correct this but it might only work for north america:
This geotransform will define the pixel to lat/lon transformation but we need an inverse of this to map our lat/lon values to a pixel on our image (this feature requires gdal-1.7.1 or greater):
Now we are ready to transform a lat/lon to pixel:
Now we can bring it all together and read our temperature data to create an image using python PIL:
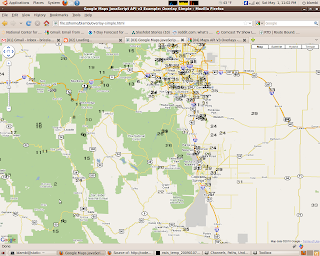
download the test data here: rwis_temp_20090107.0000.csv. This should result in an image that looks like this:

Now we can overlay this on a map using Google Maps API v3, see this example for how to overlay images. Notice that a bounding box in Google Maps is definded by lower left and upper right corners. Also, as you zoom in the resolution is not so nice. One could expand on this to support different zoom levels or even serve these images in real-time based on the bounds provided by the Google Maps API.
First you will need to know the bounds of t
 he area you are targeting. For this example we will use temperature data from RWIS roadside sensors but we are only interested in Colorado. At the time of this writing you can right click on Google Maps and click "What's here?" and it will display the latitude and longitude in the search box.
upper_left = (41.172865, -109.260864)
lower_right = (36.926183,-101.867066)
We will need to setup the projections, this EPSG (900913, google) is known to work with Google Maps (and others):
def get_mercator_projection():
  proj = osr.SpatialReference()
  proj.ImportFromEPSG(900913)
  return proj
We will also need a projection for our input decimal latitude longitude values:
def get_default_projection():
  proj = osr.SpatialReference()
  proj.ImportFromEPSG(4326)
  return proj
We will also need a geotransform array that defines the origin and pixel size of the projection we want to use. This can be created with the boundaries we chose above and the width and height of the image we want to create, there should be a relationship between negative pixel sizes and the hemisphere you are mapping because the mercator origin is not at the top left of the earth, this code attempts to correct this but it might only work for north america:
    def get_geo_transform(upper_left, lower_right, width, height, transform):
      (ul_px, ul_py, z) = transform.TransformPoint(upper_left[1],upper_left[0])
      (lr_px, lr_py, z) = transform.TransformPoint(lower_right[1],lower_right[0])
      dx = abs(ul_px - lr_px)
      dy = abs(ul_py - lr_py)
      pixel_size_x = dx / float(width)
      pixel_size_y = dy / float(height)
      if ul_px < 0 and pixel_size_x < 0: # does this make sense?
          pixel_size_x *= -1             #this might only work for North America...
      if ul_py > 0 and pixel_size_y > 0:
          pixel_size_y *= -1
      return [ul_px,
              pixel_size_x,
              0,
              ul_py, #these values are in a weird order but this is correct
              0,
              pixel_size_y]
This geotransform will define the pixel to lat/lon transformation but we need an inverse of this to map our lat/lon values to a pixel on our image (this feature requires gdal-1.7.1 or greater):
merc_proj = get_mercator_projection()
def_proj = get_default_projection()
def_transform = osr.CoordinateTransformation(def_proj, merc_proj)
geo = get_geo_transform(upper_left, lower_right, width, height, def_transform)
inv_geo = gdal.InvGeoTransform(geo)[1]
Now we are ready to transform a lat/lon to pixel:
def get_pixel(lat, lon, inv_geo, transform):
  (gx,gy,gz) = transform.TransformPoint(lon,lat)
  (gx, gy) = gdal.ApplyGeoTransform(inv_geo, gx, gy)
  px = int(gx)
  py = int(gy)
  return (px,py)
Now we can bring it all together and read our temperature data to create an image using python PIL:
#!/usr/bin/env python

from osgeo import osr
from osgeo import gdal
from PIL import Image
from PIL import ImageDraw
from PIL import ImageFont

fontfile = "/usr/share/fonts/truetype/freefont/FreeSans.ttf"
fontsize = 10
input_data_file = "rwis_temp_20090107.0000.csv"
output_image = "rwis_temp_20090107.0000.png"
upper_left = (41.172865, -109.260864)
lower_right = (36.926183,-101.867066)
width = 1200
height = 1200

class georef:

  @staticmethod
  def main():
      gref = georef(upper_left, lower_right, width, height)
      f = open(input_data_file,"r")
      for l in f.readlines():
          ls = l.split(",")
          lat = float(ls[1])
          lon = float(ls[2])
          temp = int(ls[3])
          tempf = temp * (9.0/5.0) - 459.67
          if tempf < -20 or tempf > 100:
              continue
          gref.draw_text(lat,lon,tempf)
      gref.write_image(output_image)

  def __init__(self, upper_left, lower_right, width, height):
      merc_proj = georef.get_mercator_projection()
      def_proj = georef.get_default_projection()
      self.def_transform = osr.CoordinateTransformation(def_proj, merc_proj)
      geo = georef.get_geo_transform(upper_left, lower_right, width, height, self.def_transform)
      self.inv_geo = gdal.InvGeoTransform(geo)[1]
      self.img = Image.new("RGBA",(width,height),(0,0,0,0))
      self.width = width
      self.height = height

  def draw_text(self, lat, lon, value, color = (0,0,0,255)):
      (px,py) = georef.get_pixel(lat,lon,self.inv_geo,self.def_transform)
      if px > self.width or px < 0 or py > self.height or py < 0: # throw out anything outside our domain
          return
      if (0,0,0,0) != self.img.getpixel((px,py)): #skip stuff that is here already
          return
      dr = ImageDraw.Draw(self.img)
      font = ImageFont.truetype(fontfile,fontsize)
      dr.text((px,py), "%d" % value, font=font, fill=color)
      del dr

  def write_image(self, fname):
      self.img.save(fname)

  @staticmethod
  def get_mercator_projection():
      proj = osr.SpatialReference()
      proj.ImportFromEPSG(900913)
      return proj

  @staticmethod
  def get_default_projection():
      proj = osr.SpatialReference()
      proj.ImportFromEPSG(4326)
      return proj

  @staticmethod
  def get_geo_transform(upper_left, lower_right, width, height, transform):
      (ul_px, ul_py, z) = transform.TransformPoint(upper_left[1],upper_left[0])
      (lr_px, lr_py, z) = transform.TransformPoint(lower_right[1],lower_right[0])
      dx = abs(ul_px - lr_px)
      dy = abs(ul_py - lr_py)
      pixel_size_x = dx / float(width)
      pixel_size_y = dy / float(height)
      if ul_px < 0 and pixel_size_x < 0: # does this make sense?
          pixel_size_x *= -1             #this might only work for North America...
      if ul_py > 0 and pixel_size_y > 0:
          pixel_size_y *= -1
      return [ul_px,
              pixel_size_x,
              0,
              ul_py, #these values are in a weird order but this is correct
              0,
              pixel_size_y]

  @staticmethod
  def get_pixel(lat, lon, inv_geo, transform):
      (gx,gy,gz) = transform.TransformPoint(lon,lat)
      (gx, gy) = gdal.ApplyGeoTransform(inv_geo, gx, gy)
      px = int(gx)
      py = int(gy)
      return (px,py)


if "__main__" == __name__:
  georef.main()
download the test data here: rwis_temp_20090107.0000.csv. This should result in an image that looks like this:

Now we can overlay this on a map using Google Maps API v3, see this example for how to overlay images. Notice that a bounding box in Google Maps is definded by lower left and upper right corners. Also, as you zoom in the resolution is not so nice. One could expand on this to support different zoom levels or even serve these images in real-time based on the bounds provided by the Google Maps API.

Monday, July 30, 2007
Maven2 SWT builds
Building a SWT application with maven can be tricky. The public maven repositories don't have current versions of SWT. You must download the recent version for each platform that you need to support and place them in your own repository. Since SWT needs the native libraries for your platform, you will need to package those in individual jar (or zip) files and deploy those to your local repository. I recommend giving them the same artifactId as your Java SWT libraries with a suffix like '-native'. So for three platforms you should have six artifacts like the following.
swt/swt-win32/3.2.2/swt-win32-3.2.2.jar
swt/swt-win32-native/3.2.2/swt-win32-native-3.2.2.jar
swt/swt-linux-gtk/3.2.2/swt-linux-gtk-3.2.2.jar
swt/swt-linux-gtk-native/3.2.2/swt-linux-gtk-native-3.2.2.jar
swt/swt-macosx/3.2.2/swt-macosx-3.2.2.jar
swt/swt-macosx-native/3.2.2/swt-macosx-native-3.2.2.jar
Now you can use profiles to determine the proper dependency and the maven-dependency-plugin to unpack the proper native libraries. First create a profile for each platform that you need to support in your pom.xml file and set properties defining the proper dependencies for each platform:
<profiles>
   <profile>
     <id>unix</id>
     <activation>
           <os>
             <family>unix</family>
           </os>
     </activation>
     <properties>
           <swt.os-specific-dep>swt-linux-gtk</swt.os-specific-dep>
           <swt.version>3.2.2</swt.version>
     </properties>
   </profile>
   <profile>
     <id>windows</id>
     <activation>
           <os>
             <family>windows</family>
           </os>
     </activation>
     <properties>
           <swt.os-specific-dep>swt-win32</swt.os-specific-dep>
           <swt.version>3.2.2</swt.version>
     </properties>
   </profile>
   <profile>
     <id>mac</id>
     <activation>
           <os>
             <family>macosx</family>
           </os>
     </activation>
     <properties>
           <swt.os-specific-dep>swt-macosx</swt.os-specific-dep>
           <swt.version>3.2.2</swt.version>
     </properties>
   </profile>
</profiles>
You can reference these properties in your pom for dependencies and for the unpack goal of the maven-dependency-plugin. The example below uses the appassembler-maven-plugin output directory to unpack the native libraries. You can use the appassembler plugin to create scripts for launching your application and add extra JVM arguments which you will need to do.
<build>
<plugins>
 <plugin>
   <groupId>org.codehaus.mojo</groupId>
   <artifactId>appassembler-maven-plugin</artifactId>
   <executions>
     <execution>
       <id>assemble</id>
       <phase>package</phase>
       <goals>
         <goal>assemble</goal>
       </goals>
       <configuration>
         <programs>
           <program>
             <mainClass>esrl.gsd.fsl.enroute.client.Client</mainClass>
             <name>enroute-client</name>
           </program>
         </programs>
         <extraJvmArguments>-Djava.library.path=lib</extraJvmArguments>
       </configuration>
     </execution>
   </executions>
 </plugin>

 <plugin>
    <groupId>org.apache.maven.plugins</groupId>
    <artifactId>maven-dependency-plugin</artifactId>
    <executions>
      <execution>
        <id>unpack</id>
        <phase>package</phase>
        <goals>
          <goal>unpack</goal>
        </goals>
        <configuration>
          <artifactItems>
            <artifactItem>
              <groupId>swt</groupId>
              <artifactId>${swt.os-specific-dep}-native</artifactId>
              <version>${swt.version}</version>
              <type>jar</type>
              <overWrite>true</overWrite>
              <outputDirectory>
                ${project.build.directory}/appassembler/lib
              </outputDirectory>
            </artifactItem>
          </artifactItems>
        </configuration>
      </execution>
    </executions>
  </plugin>
</plugins>
</build>
Notice the extra JVM argument given to the appassembler plugin and the output directory for the unpack configuration.
%> mvn package
This will unpack the proper native libraries in the lib directory of the assembled application, and create shell scripts for launching the application as well as copy all the other necessary dependencies to the assembled application. See the dependency and appassembler plugins for more configuration options.
Tuesday, July 3, 2007
Parallel Queries with Postgres
This is a little off topic from what I usually write about but just wanted to point this out. A project called pgpool-II is a tool for Postgres that allows you to run parallel queries (among other things) in a clustered environment. They haven't released anything yet, but you can check out pgpool-I to check out some of the other benefits it provides.
Thursday, May 3, 2007
More Venting about Annotations
It's been a while since I've posted here and I've been distracted by some other projects. For example check out lift (formerly scala with sails), a web development framework built with scala. But now its back to working on Openlims and finding myself frustrated with Java Annotations.
Java Annotations lack of support for inheritance can make for lots of code duplication. This is something to be aware of when designing something around the use of Annotations. Consider this example:
Ideally you would like these to be of the same type, so you don't have to type 'name' twice and so you can pass the instance annotation to a method that takes a common type.
Unfortunately this is not currently possible and forces the developer to take caution to avoid code duplication. It becomes unclear the best way to avoid this. Wrapper objects can be used, but it is not as 'elegant'. Annotations are very useful, but perhaps should not be used in place of regular objects.
Java Annotations lack of support for inheritance can make for lots of code duplication. This is something to be aware of when designing something around the use of Annotations. Consider this example:
public @interface Observable {
  String name();
}
public @interface Setable {
  String name();
}
Ideally you would like these to be of the same type, so you don't have to type 'name' twice and so you can pass the instance annotation to a method that takes a common type.
public @interface Observable {
  String name();

  public @interface Setable {
    //name is NOT a member of Setable
    //Setable is not a subtype of Observable
  }
}
public Class MyClass {
  public MyClass(Observable o) {}
}
public Class MyPersonalClass extends MyClass {
  public MyPersonalClass(Setable s)
  {
    super(s);//won't work
  }
  @Setable(name="rodney")//name is not a member of Setable
  public void annotatedMethod() {
  }
}
Unfortunately this is not currently possible and forces the developer to take caution to avoid code duplication. It becomes unclear the best way to avoid this. Wrapper objects can be used, but it is not as 'elegant'. Annotations are very useful, but perhaps should not be used in place of regular objects.
Monday, January 22, 2007
Using AspectJ with Annotations
Recently I've been exploring annotations and how to use them with AspectJ. I've ran into a few things that I found to be odd, and may be due to the fact that annotations are still new to Java. Consider this example:
The following aspect with the required pointcut will match against the method above like one would expect.
Instead of getting the arguments from thisJoinPoint we would like the arguments to be part of the pointcut like the following:
But when this is compiled we get the warning "advice defined in CheckRequired has not been applied". Why is this? Changing the method from static to non-static doesn't make a difference. You'll notice that MyClass.myMethod takes a second argument that is never used in this example. Removing the argument will cause the second example of CheckRequired.aj to advise that pointcut. I came across this problem with a method that actually does need a second argument so that is why I included it in this example.
/* Required.java @Required annotation */
import java.lang.annotation.ElementType;
import java.lang.annotation.Retention;
import java.lang.annotation.RetentionPolicy;
import java.lang.annotation.Target;

@Retention(RetentionPolicy.RUNTIME)
@Target(ElementType.METHOD)
public @interface Required {
  String[] names();
}
/*MyClass.java*/
import java.util.Map;
public class MyClass {

 @Required(names = {"id","label"})
 public static void myMethod(Map<String,String> args,Object obj)
 {
  //id and label should be guaranteed not null
 }
}
The following aspect with the required pointcut will match against the method above like one would expect.
/*CheckRequired.aj*/
import java.util.Map;

public aspect CheckRequired {

 protected pointcut required(Required required) :
  execution(@Required * *(Map<String,String>,..))
  && @annotation(required);

 before(Required required) : required(required)
 {
    Map<String,String> args = (Map)thisJoinPoint.getArguments()[0];
    for (String name:required.names())
    {
      if (!args.containsKey(name))
        throw new IllegalArgumentException(name + " is a required parameter.");
    }
 }
}
Instead of getting the arguments from thisJoinPoint we would like the arguments to be part of the pointcut like the following:
/*CheckRequired.aj*/
import java.util.Map;
public aspect CheckRequired {
 protected pointcut required(Map<String,String> args, Required required) :
  execution(@Required * *(Map<String,String>,*))
  && @annotation(required)
  && args(args);
 before(Map<String,String> args, Required required) : required(args,required)
 {
    for (String name:required.names())
    {
      if (!args.containsKey(name))
        throw new IllegalArgumentException(name + " is a required parameter.");
    }
 }
}
But when this is compiled we get the warning "advice defined in CheckRequired has not been applied". Why is this? Changing the method from static to non-static doesn't make a difference. You'll notice that MyClass.myMethod takes a second argument that is never used in this example. Removing the argument will cause the second example of CheckRequired.aj to advise that pointcut. I came across this problem with a method that actually does need a second argument so that is why I included it in this example.
Tuesday, December 5, 2006
Building scala from maven - maven-scala-plugin
I recently wanted to build scala code in maven. There was no plugin to do this but I did find a patch for maven. I didn't like this approach because maven is supposed to be plugin based and you should be able to extend it without changing it. So I wrote a quick and dirty little plugin http://millstone.iodp.tamu.edu/~blambi/maven-scala-plugin(docs). Update 7/11/07: The maven-scala-plugin is available on Google Code
At first I wanted to use the api provided by scala to compile code. I used the scala eclipse plugin as an example, and got it working. When I ran it as a maven plugin I got a strange error: "object scala not found". I assumed this meant that the package scala wasn't available, due to the fact that the scala jar files are not included on the classpath when the jvm is started by maven. So next I tried creating a new ClassLoader and force loading every class in the scala libraries, but I received the same error.
The simple way, I decided, was to run a new jvm with the proper classpath. This is what scalac does when it runs. So I simply setup the classpath and execute 'java scala.tools.nsc.Main'. It may be a naive implementation, but it works and I'm happy I can now compile my scala code using maven.
Subscribe to:
Posts (Atom)